
In Mr. Mine, the Fermium Reactor is a late-game system that changes how you progress.
Up to this point, most of your time in this game about mining is spent upgrading your mineshaft, collecting resources, and scaling income.
But once the Reactor unlocks, the focus shifts to managing a full nuclear Reactor system.
The Fermium Reactor lets you generate Fermium, which is then used for multiple upgrades. These upgrades are essential for progressing faster in late-game Mr Mine gameplay.
This is where the Reactor layout starts to matter.
Unlike early systems, the Reactor is not just about upgrades. Placement, spacing, and balance all affect your results.
In this guide, you’ll learn how the Reactor works and the best layouts to get Fermium.
Understanding Reactor Mechanics
Before building the best layout, you need to understand how the Reactor actually works and its core game mechanics.
How Energy Generation Works
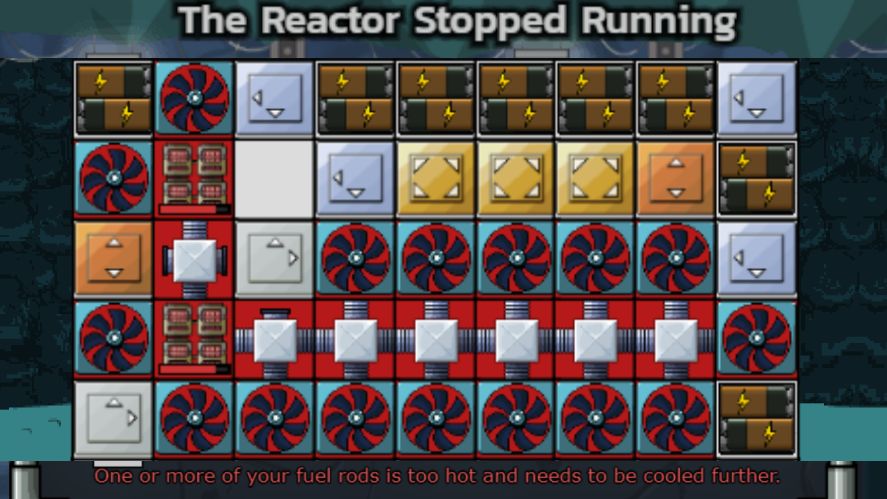
Once you have the Reactor unlocked, you create fuel rods and burn them to get Energy and isotopes. However, they also produce heat.
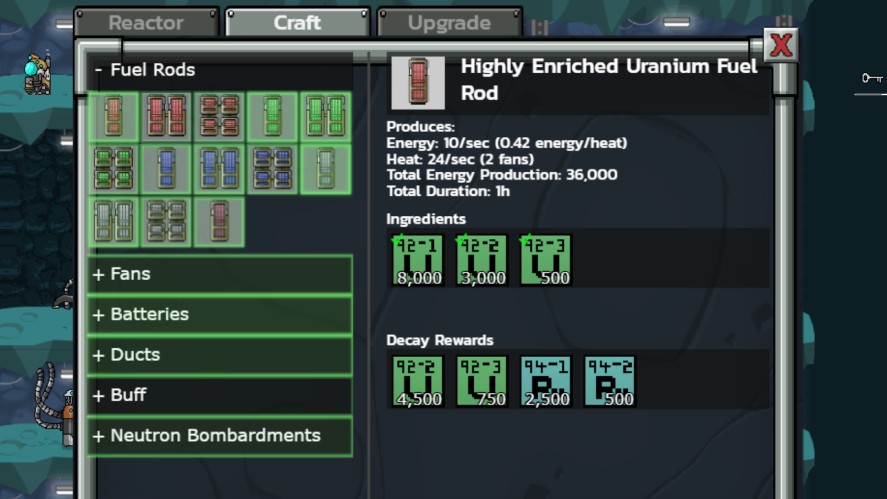
For example, a basic Highly Enriched Uranium Fuel Rod generates 10 energy per second over 1 hour, but also produces 24 heat.
Stronger rods can generate more energy and more heat. And if there’s heat in the Reactor system, it won’t run.
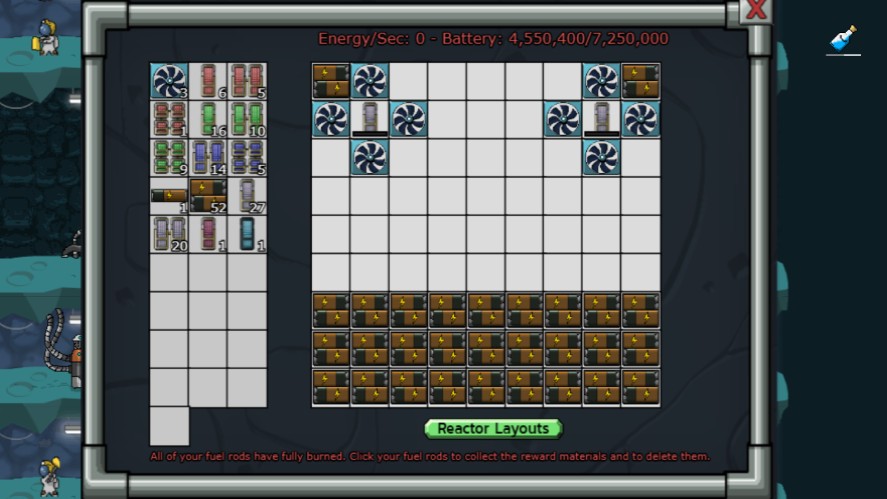
That’s why cooling is mandatory. You use fans (cooling units), and each fan removes 12 heat.
So in real terms, one strong rod might need 10–15 fans worth of cooling. If you don’t meet that requirement, your layout fails.
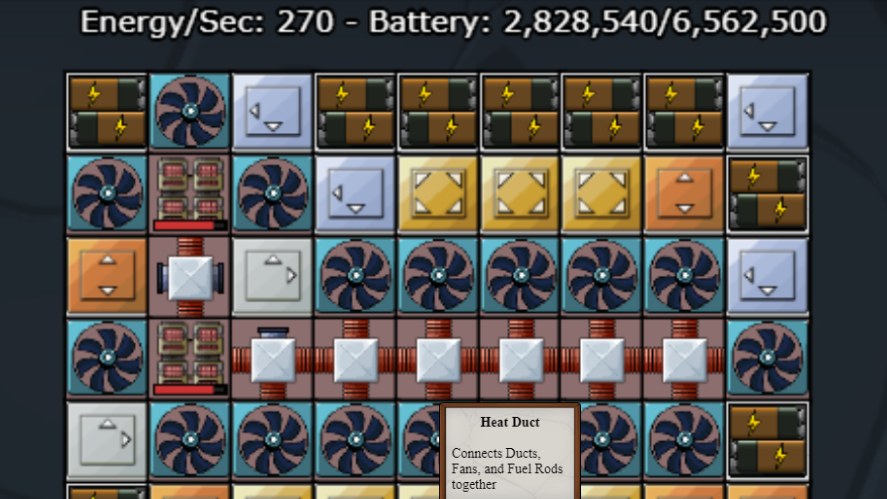
There is also a connection system. Heat and energy don’t just exist; they move through heat ducts.
This is where the layout game strategy begins. You are not just placing items, but you’re building a system where everything must connect correctly.
Core Components Explained
Here are the actual components you work with in the Fermium Reactor layout.
Fuel Rods
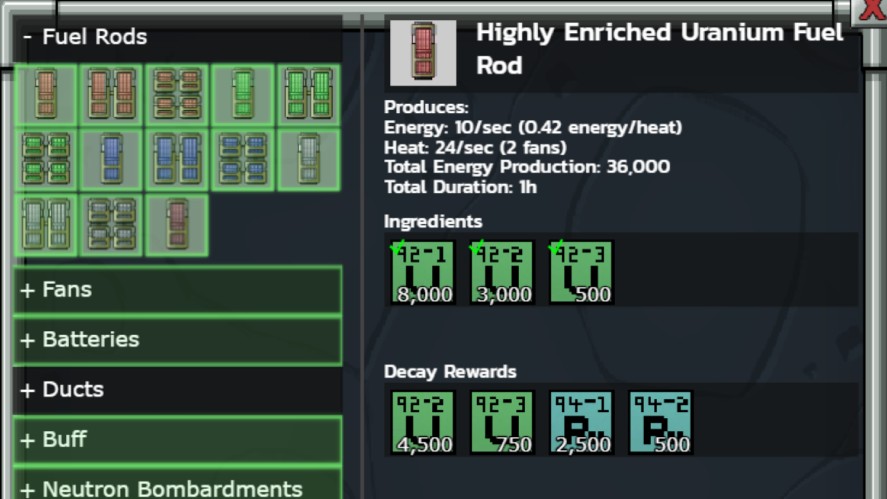
These generate energy, isotopes, and heat. Different rod types have different burn times and outputs (from 1 hour to 48 hours).
Fans
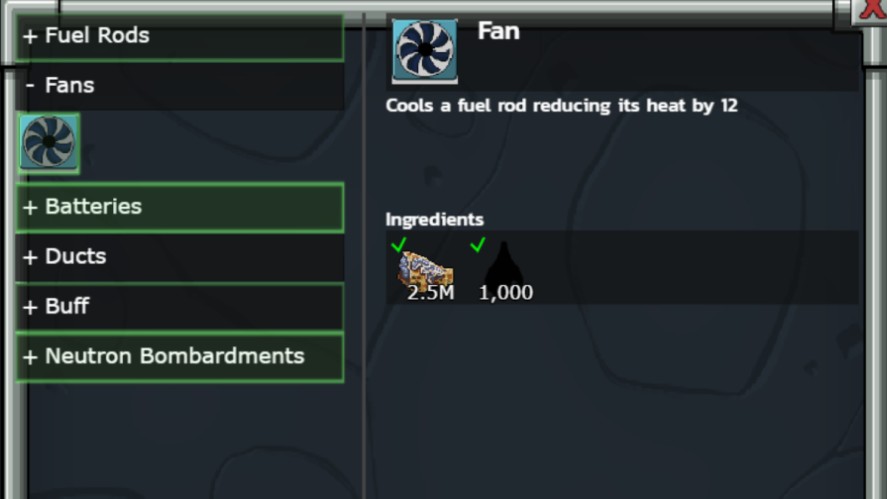
Each fan removes 12 heat. If you don’t have enough fans, the Reactor shuts down.
Batteries
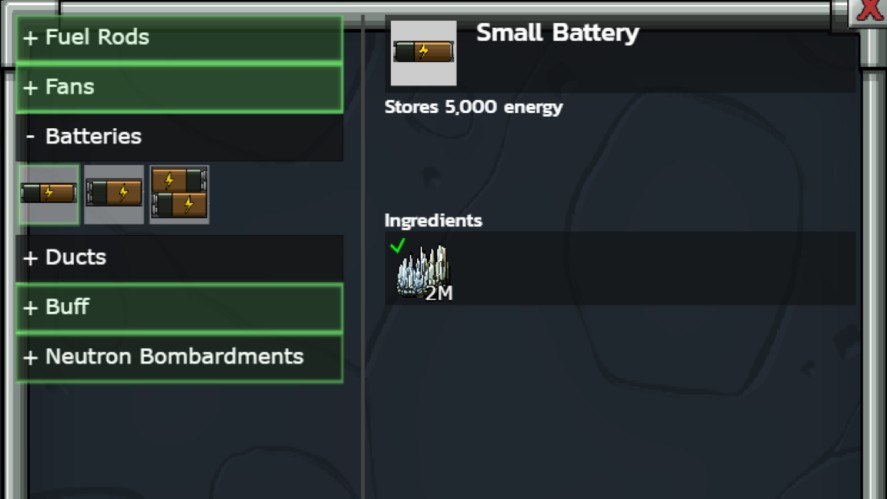
Batteries store Energy. Without batteries, energy is wasted and cannot be used for creating fuel rods, bombardments, or buying buffs from Mr Mine’s buff lab.
Heat Ducts
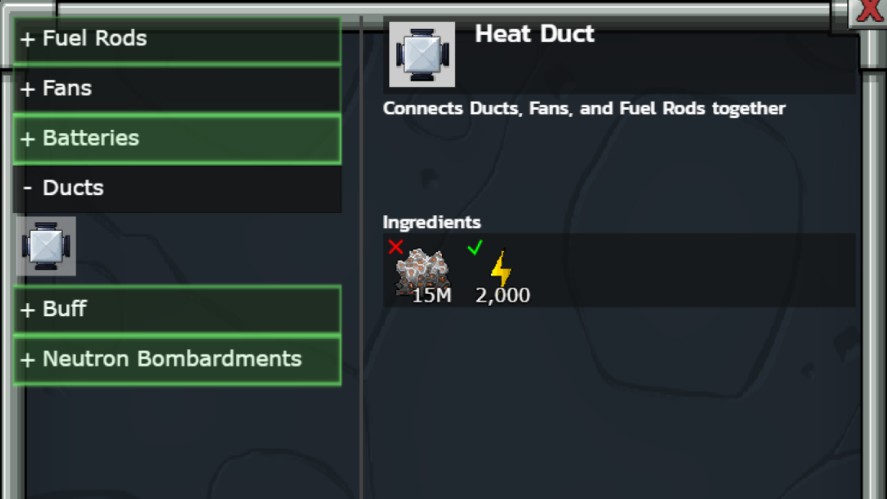
These connect rods to fans and other components. Without proper connections, cooling does not apply correctly.
Bombardments

These consume energy to create Einsteinium and Fermium, which is the real goal of this guide.
Common Mistakes Beginners Make
Most players fail here because they treat the Reactor like a normal upgrade system. Common mistakes include:
- Stack rods without calculating heat
- Poor spacing and connections
- Ignoring resource bottlenecks
If you understand these mechanics, you’re already ahead of most of the Mr Mine community and how Playsaurus designed the system.
The next step is learning how to actually build efficient layouts.
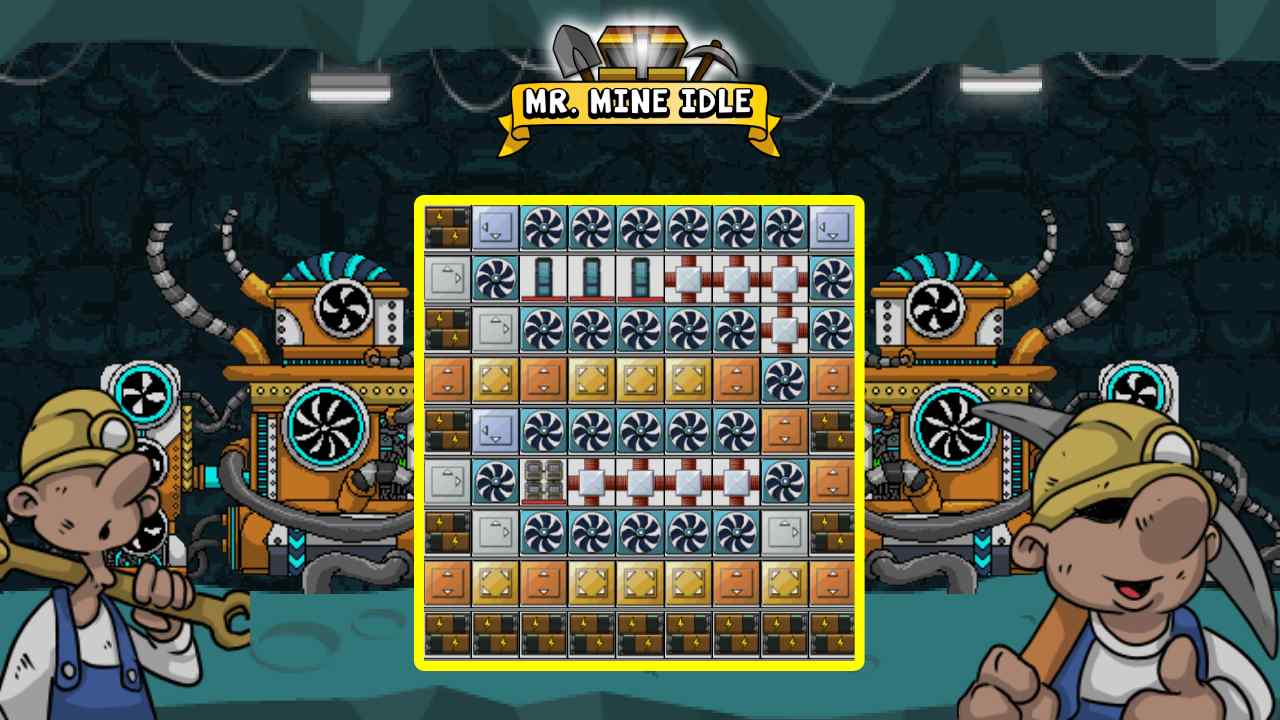
Mr Mine Fermium Reactor Layout Basics
Before jumping into builds, you need to understand how the Reactor grid actually works.
The Reactor uses a tile-based grid system. Each tile can hold one component, like fuel rods, fans, batteries, or ducts.
Placement is not random. There are a few key rules:
- Components only affect adjacent tiles (up, down, left, right)
- Cooling only works if it is properly connected
- Heat must be fully managed, or the setup becomes inefficient
This creates a constant trade-off between efficiency and stability, similar to many clicker games.
If you pack too many rods together, you get high energy but also extreme heat. The goal is to find a balance.
Another important concept is symmetry vs asymmetry.
Symmetrical layouts are easier to manage and scale. They help distribute heat evenly.
On the other hand, asymmetrical layouts can sometimes push higher output. However, they are harder to control and often risk overheating.
For most players, especially early on, symmetry is the safer choice.
Here are some early optimization tips:
- Never place rods without planning cooling first
- Leave space for future expansion
- Use simple patterns you can repeat
- Focus on stability before chasing max output
Getting these basics right will make every future layout much stronger.
Before Fermium Setup
Before you even think about building a Fermium Reactor layout, you need to understand one thing: Fermium is not generated directly.
In Mr. Mine, Fermium comes from a Fermium Bombardment. To craft it, you need:
- Energy
- Nitrogen 1-3
- Einsteinium 1-3
Each of these comes from a different system, and your Reactor setup must support all of them.
Step 1: Generating Energy
Energy is the foundation of everything in the Reactor.
You generate it using fuel rods inside your Mr Mine Nuclear Reactor.
At this stage, you don’t need a max-efficiency setup yet. A stable layout that avoids overheating is enough to get started.
You can use level 1 Reactor layouts here to build up your first energy supply.
Step 2: Getting Nitrogen
Nitrogen is the easiest part of the process.
It is mined directly by your miners on the Moon. As long as your mining progression is strong, you will naturally collect enough Nitrogen over time.
Step 3: Producing Einsteinium
This is where things get more complex. Einsteinium is created through a different bombardment: Californium Bombardment.
To craft this, you need:
- Energy
- Californium (mined on Earth)
- Helium 1-3 (mined on the Moon)

So, before you can even make Fermium, you must first build a setup that supports Californium Bombardment.
Check out our Reactor layouts here for creating Einsteinium.
Mr. Mine Fermium Reactor Layouts
Once you’ve got the Energy, Nitrogen, and Einsteinium, craft some Einsteinium Bombardments and use those Fermium Reactor layouts below.
| Layout | Max Energy | Energy/Sec |
|---|---|---|
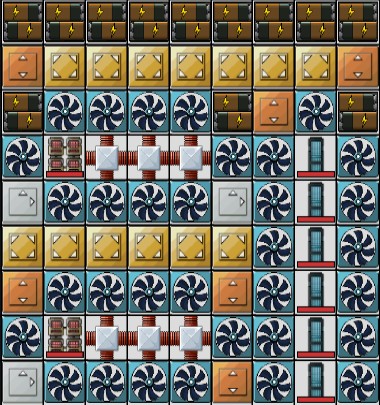 | 4.9M | 60 |
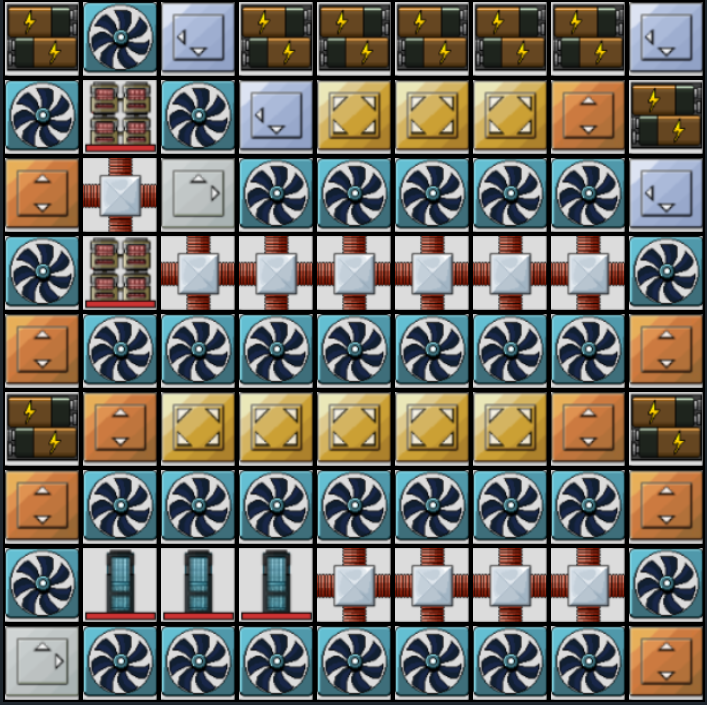 | 3.662,5M | 0 |
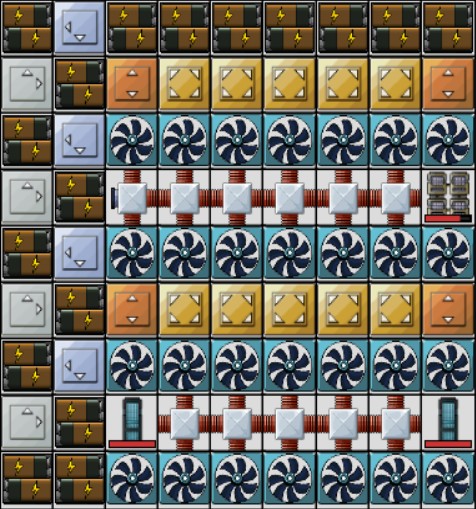 | 7.475M | 24 |
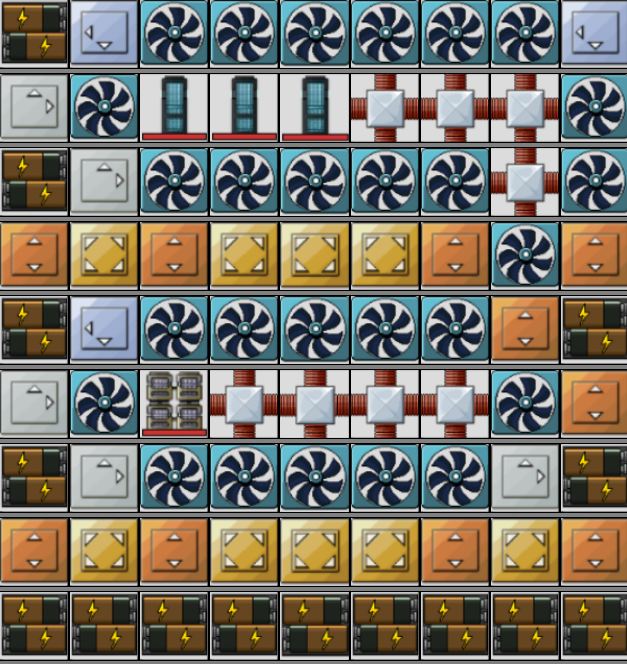 | 7M | -36 |
 | 7M | -36 |
 | 3.637,5M | 0 |
Tips to Improve Mr Mine Fermium Reactor Layout
No matter which setup you use, small improvements can make a huge difference in your Mr. Mine Reactor performance.
These tips will help you get more energy, reduce waste, and scale faster in late-game.
Resource Management
Even the best layout won’t work if your resources are not managed properly.
For Fermium farming, always think in chains: Energy > Einsteinium > Fermium.
If one part is slow, everything slows down. Most players struggle because their Einsteinium production cannot keep up.
For fuel usage:
- Avoid overloading your Reactor with rods you can’t support
- Use rods that match your current cooling capacity
- Don’t waste high-tier rods in inefficient layouts
Efficient fuel usage is key in all idle mining games, especially in a system like this.
Layout Adjustments Over Time
Your Reactor should not stay the same forever.
As you progress, your resources, upgrades, and goals change. That means your layout should evolve too.
You should rebuild your Reactor when:
- You can craft better cooling or upgrades
- Your current setup starts overheating
- Your energy output no longer supports your bombardments
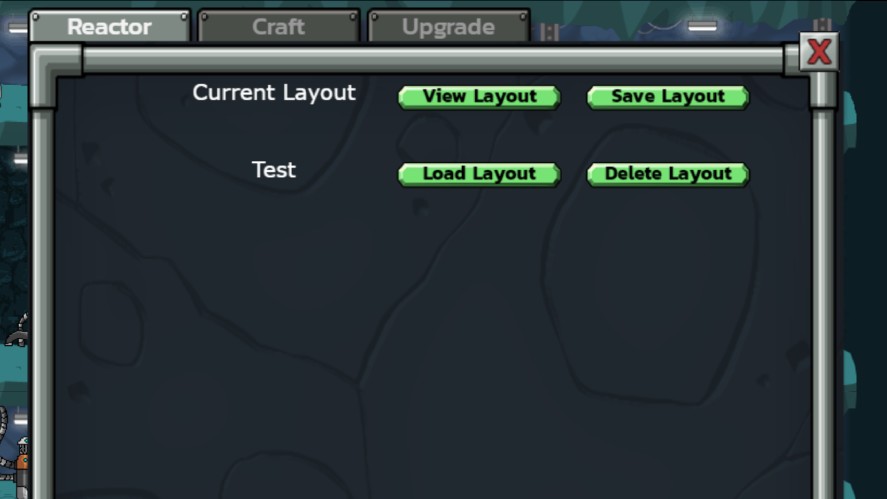
For scaling, start with safe, spaced layouts and move into balanced designs. Then, transition into dense, high-output builds. You can also save the Reactor layouts for later use.
This step-by-step approach is how experienced players in the Mr Mine community optimize their setups over time.
In the late game, the goal is not just maximum output; it’s consistent and stable energy generation that supports your entire progression system.
Advanced Strategies for Fermium Reactors
By the time you’re working with Fermium, the Reactor is no longer a simple system; it’s a core part of your entire progression loop in Mr. Mine.
At this stage, small inefficiencies start to matter a lot. A slightly better layout can mean faster energy, more bombardments, and smoother scaling.
That’s why advanced players spend time refining their setups instead of just adding more rods.
One of the best ways to improve is by learning from the Mr Mine community. Players often share tested layouts, results, and experiments on Mr Mine Wiki, Steam, and Discord.
Still, copying layouts directly is not always the best move. Your upgrades, resources, and progression might be different.
The real skill is understanding why a layout works, then adjusting it to fit your own setup.
Hybrid Fermium Reactor Layouts
Most efficient Reactors are not extreme; they sit somewhere in the middle.
Instead of going full safe or full max output, strong builds mix both ideas. You place rods close enough to benefit from adjacency, but not so tight that heat becomes uncontrollable.
This creates a flexible layout that:
- Produces solid energy
- Stays stable over time
- Can adapt as you unlock better upgrades
Hybrid setups are especially useful because they scale well. As your cooling improves, you can slowly increase density without rebuilding everything from scratch.
Min-Maxing Output
Once your basics are solid, optimization becomes more about precision than big changes.
The biggest gains come from:
- Cleaner spacing between rods and cooling
- Better positioning so components affect multiple tiles
- Reducing wasted heat that doesn’t translate into output
Instead of placing cooling everywhere, focus it where the heat is highest. One well-placed cooling unit can be more effective than several poorly placed ones.
Also, pay attention to how rods and buffs interact. Grouping them correctly can boost output, but overdoing it creates heat spikes that cancel the benefit.
At this level, every tile matters. The goal is to get the maximum value per space used.
Late-Game Optimization
In the late mine clicker game and incremental games, consistency becomes more important than peak performance.
A layout that looks strong but overheats or breaks during idle time will slow you down. What you want instead is a Reactor that runs smoothly while you’re offline and supports your long-term progression.
This means:
- Keeping heat under control at all times
- Matching energy production with your bombardment needs
- Avoiding setups that require constant adjustments
The best setups are not always the most powerful on paper; they are the ones that keep producing without interruption.
Read More: Mr Mine Reactor Layouts: Best Designs For the Nuclear Reactor
Frequently Asked Questions
The best layout depends on your Reactor level. You should use the layouts based on the number of tiles you have.
Keep a balance between rods and cooling. If the heat is too high, reduce the rod density or add more cooling.
No. A layout only works well if you have enough tiles and cooling. Otherwise, it can perform worse than simpler layouts.
As soon as possible. Or upgrade when your current setup can’t produce enough energy or starts overheating.
Final Thoughts on Mr Mine Fermium Reactor Layout
The Mr. Mine Fermium Reactor layout is a key part of late-game progression in Mr.Mine, and how you build it directly affects your efficiency.
The most important thing is to balance power and heat while building your Reactor in stages. Start with stable layouts, then move into more optimized designs as your resources improve.
Your setup should always match your current progression. A layout that works well now may not be effective later, so adjusting over time is part of the process.
In the end, the best way to improve is to test different layouts, learn how the system behaves, and refine your design based on what works best for you.
